When asked if Sage ACT!1 can support time-tracking, tech support incidents, or case management, depending on requirements, the answer is either “absolutely” or “kinda sorta.” Using ACT! with some minimal addons is one way to make sure your small business crm software provides a great ROI.
Comprehensive support management can be integrated into ACT! using an external program such as Tele-Support HelpDesk (this is great if your tech support people don’t work in ACT!; ACT! users still see the results of tech support).
Support, customer service, and trouble-ticket systems also can be designed using ACT! custom tables via a third-party program (this is also a great option, because all details sync with other ACT! data, so it’s available to remote users – another way for you to get the biggest bang for your buck from crm sales software).
But what if you’re needs are very basic? Today we’ll cook up a simple way to track time spent and manage open “trouble tickets” in ACT!, with the help of an inexpensive add-on for reporting. If your requirements are simple, this may be all you need to get the job done effectively.
Our recipe includes:
- Custom Activities
- Custom History Results
- The ACT! timer and a Function Key
- The Record History function
- TopLine Dash Dashboard for tracking and reporting
Using the ACT! timer to track time spent, a custom Activity/History with custom results, and TopLine Dash filtered to show the custom results, you can have a log of open tickets, time spent, and support services provided within a specific time period.
ACT! Histories are ACT! activities that have been completed, so the first step is to create a custom Activity.
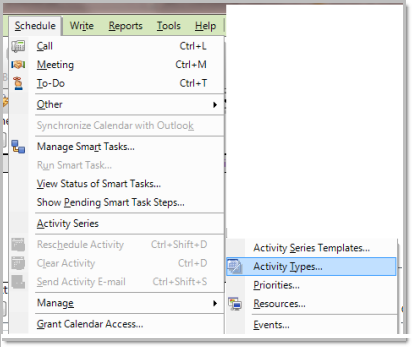
- Under the Schedule list menu, select Manage
- Pick Activity Types from the flyout menu.
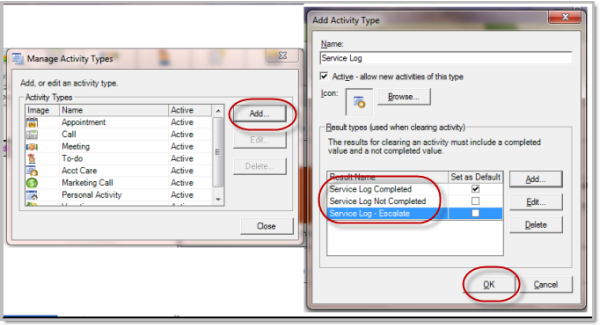
- Select Add in the Manage Activity Types dialog and Add an Activity type.
- We’ve called ours “Service Log.”
- Modify the Result Name. ACT! provides two options, Completed and Not Completed. Edit the default options – even if these are the results you expect, preface those options with the specific Activity type that the results represent. Otherwise when you run your report, you’ll see a series of Completed and Not completed options, with no connection to the activity they represent!
Click OK when done. The workflow looks like this:
Next we’ll create a list of typical support events that can be used when adding the “Regarding” detail in History. For the sake of consistency, using a standardized list improves reporting accuracy and streamlines entry.
The modification can be made from any contract record. Click any Schedule Activity Icon to pop up the Schedule Activity dialog.
- Chose your new Activity Type.
- Click on Regarding to display the Edit List Values option at the bottom of the regarding list
- Click Edit List Values
- Add the standardized values that you want to display on the list. Delete the four default options. Click OK when finished; you can even add the values as you go, when the specific type of service occurs for the first time.
.
Now that the Activity/History Type, the associated Results, and the list of Regardings has been create, use the ACT! timer to track the beginning and end of the event.
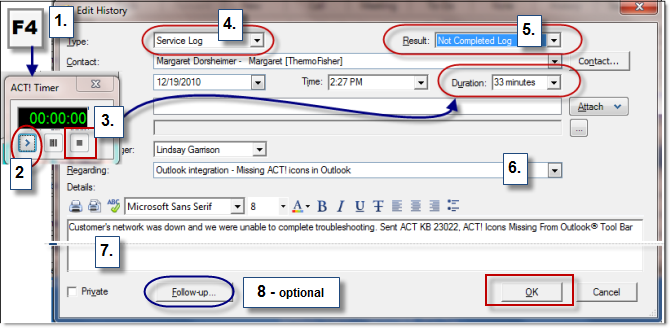
- Click the F4 function key to launch the timer.
- Click the start button when you’re ready to begin the session.
- Click the end button when you’re done. The elapsed time is entered into the duration.
- Chose the history type (ACT defaults to Call or Appointment, depending on the version)
- Chose the result of the support session.
- Select the regarding from the custom list of typical support events.
- Add notes about the event if they will be helpful.
- Optionally, click Follow-up to schedule a next step with this customer. Then click OK.
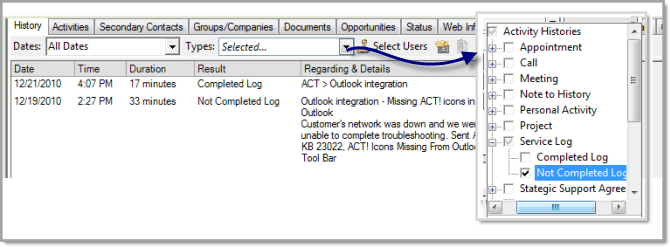
Although it’s not practical for reporting purposes, notice that by filtering History Types on the contact record, you are able to display the exact results you want.
Finally, reporting can be done using TopLine Dash Manager. This add-on dashboard is a great management tool to add to your bag of tricks, regardless, so you’ll find many other uses for it.
By creating a History type Dashboard, filtering it to show just the specific History Results within a predetermined time range, for specific users, you’ll be able to stay on top of open events, understand the most common support events and the typical amount of time it takes to resolve them. The dashboard can be exported to Excel and can be used for billing or to reconcile support agreements with the services provided.
The cost of creating this service and support ticket system is the sweat equity involved in the set up and the cost of the TopLine Dashboard Manager software, which is just $149 [yes, you want the Manager edition, NOT the personal edition]. The dashboard is required only by someone doing the service and support reporting and is not required to enter the support details.
Instructions presume Administrator level privileges and access to a master or Publisher database; these changes cannot be made on a remote database. However, if made on a master database, the changes will sync to the remotes.
As always, remember that any database design should support your company’s strategy, business processes, and reporting requirements. Begin with a needs assessment of requirements or reach out to an ACT! Certified Consultant who can help you with ACT! software consulting.
(1) Note: This tutorial applies to ACT 2006 and higher.


